- Used images:
Help Files:
- Create a new Photoshop document 1200 x1800px, and resolution - 300px/inch. The layer style effects for letters depend of the shapes size and resolution.
- The shape of Octopus tentacles letters is based on bold and rounded "Anja Eliane" font.
- Type the letter (create each letter in the separate layer), use font size around 130pt for this size of Photoshop document.

- Rasterize the letter and change its shape with the regular round Brush and Eraser tools. Draw small suction cups and curled ends.


- To create smooth and sharp edges for the transformed letters, you may convert them into the vector shapes using Illustrator, but you may keep raster letters as well.
- In order to create 3D layers I used different smaller document without a lot of empty space around. You may download this document .
- In order to create 3d letter, go to 3D > Repousse:
- If you have vector shape layer, make active path thumbnail and choose "Selected path".
- If you have regular rasterized layer, load selection for the letter and add Layer Mask, make active "layer Mask" thumbnail and choose 3D > Repousse > Layer Mask.

- Choose from Presents "Inflate Sides".

- Open 3d layers palette. Make active "Scene" adjustments, use Interactive Quality for beginning.

- Apply setting and materials only to "Front Inflation Material".

- Load skin_pattern.psb file for Diffuse setting and "skin.psb" for "Bump".

- Use Lights Preset from help files.

- Choose "Ray Traced Final" Quality after applying all adjustments.

- If you would like to add more light reflections to the tentacles surface, duplicate letter 3D layer. Choose again "Interactive Painting" quality for this layer.

- Keep the same lights preset, but use different settings for the Inflation Material:

- Return to the textured 3D letter layer, rasterize it and move this shape back to the main Photoshop document. Make the same thing with the "black and white"reflection layer.


- Go to Image > Auto Contrast.
- Then duplicate letter layer 4 times and put "black and white"reflection layer above.

- Make active 2-nd duplicate (we will use the 1-st one to create shadow).
- Apply Inner Glow, Bevel and Emboss, Gradient Overlay layers style effects to this layer.


- The second layer is not really necessary, but you may add translucent reflections from nearby letters and glow effect dots. Adjust Opacity 80% and Fill 0%.


You may download this pattern here.

- Here are the settings for the 3-rd duplicate, Set up Opacity - 100%, Fill = 0%.

- Erase some areas of the crescent to create clouds covering effect.


- Then make active "black and white"reflections layer.
- Go to Image > Adjustments > Levels. Make layer more contrast.

- Apply Linear Dodge (Add) and Opacity 25%.

- Return to the very first letter duplicate to create a shadow. Move this layer couple pixels right and 1 pixel top.

- Here is the result of using soft cloud brush. Play with brush Opacity settings to get smoother curls:


- Then apply Gaussian Blur filter to the shadow layer.

- Use the same actions to create others letters.
- Here is the description of eye creation.

- Create round shape.

- Apply Fill = 0% and following layer style effects. Use preset Photoshop "Strings" pattern.


- Create smaller circle in a new layer.


- Duplicate first larger circle and place it above the small one.
- Apply new layer style effects.


- Use clouds brushes to add some curls.

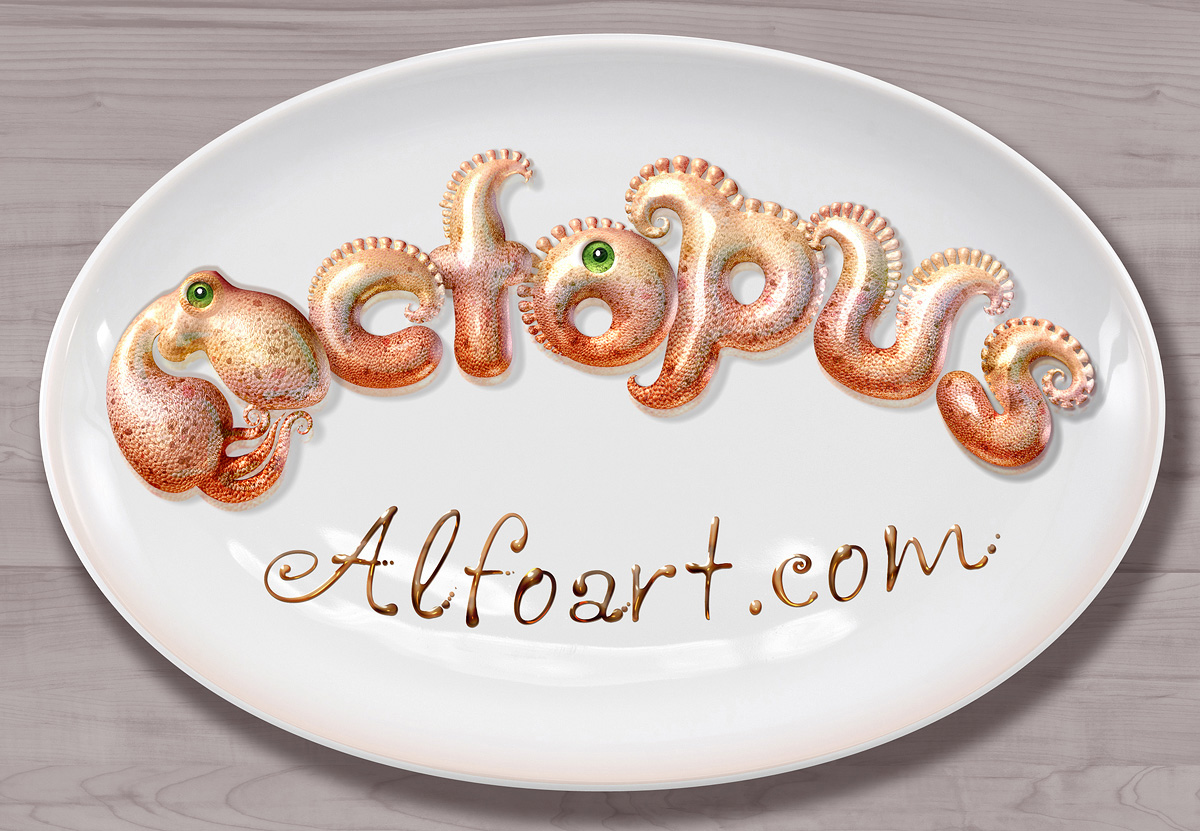
- Here are all letters:

- you may rotate and move letters to place them on the oval plate:


- The last small element - letters reflection on the white glossy plate surface:

- Load selection for all letters(Ctrl +Shift +Click letter thumbnail). Go to Edit > Copy Merged. Place copied letters layer above the plate but below the actual letters, move this layer down a bit. Apply Opacity 30%.

- Correct levels for this layer to make it lighter.

And here is the result!
