What you’ll be creating
We’ll start this tutorial by setting up a night scene from a sky, two deserts images and starry textures. Then we’ll add the planets, the model, apply some nebula textures as well as create some abstract elements and blend them all together using adjustment layer, masking and brush. Finally we’ll add more lighting effect and adjust color of the whole scene. You’ll need Photoshop CS3 or newer to follow this tutorial.
Tutorial Resources
- Model
- Star background
- Sky
- Background
- Foreground
- Light effect
- Nebula 1
- Nebula 2
- Nebula 3
- Nebula 4
- Planet 1
- Planet 2
- Wire triangle
Step 1
Create a new document in Photoshop with the given settings: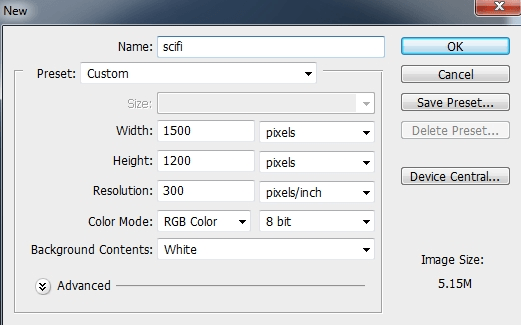
Step 2
Press Cmd/Ctrl+Shift+N to make a new layer. Hit G to active the Gradient Tool and choose Radial Gradient with the colors #384962 and #09131d. Drag a line from the top center to the bottom of our white canvas:
Step 3
Open the star background pack. I chose the image “starry 1″ to drag onto our main document and change the mode to Color Dodge 100%:

Duplicate this layer three times and arrange them around the dark background to make the starry effect stronger and more visible:

Step 4
Place the sky image over the main document and change the mode to Soft Light 100%:

Click the second button at the bottom of the Layers Panel to add a mask to this layer. Use a basic, soft brush with black color, the opacity about 30-40% to reduce the cloud effect on the background:

Step 5
Drag the background image into our working document:
Add a mask to this layer and use a soft black brush to remove the sky edges and blend it with the starry sky:

Step 6
I used an adjustment layer with Clipping Mask to darken the desert. Go to Layer > New Adjustment Layer > Curves: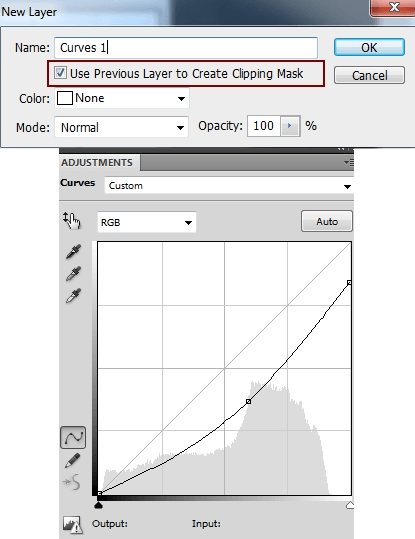

Step 7
I used a Color Balance adjustment layer (Clipping Mask) to match the desert color with the background: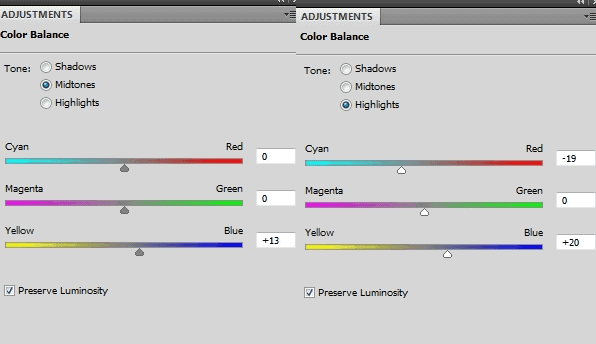

Step 8
Open the foreground image and place it in the foreground of our main document, transform it as shown below:
Add a mask to this layer and blend the foreground with the background:

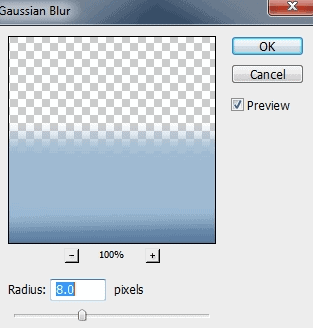
Go to Filter > Blur > Gaussian Blur and set the radius to 8px:
On the Filter Mask use a soft black brush to remove the blur effect on the midground and background and create a depth for the scene:

Step 9
I used Curved to darken the foreground. On this layer mask use a soft black brush with the opacity about 40-45% to reduce the dark effect on the part near the background: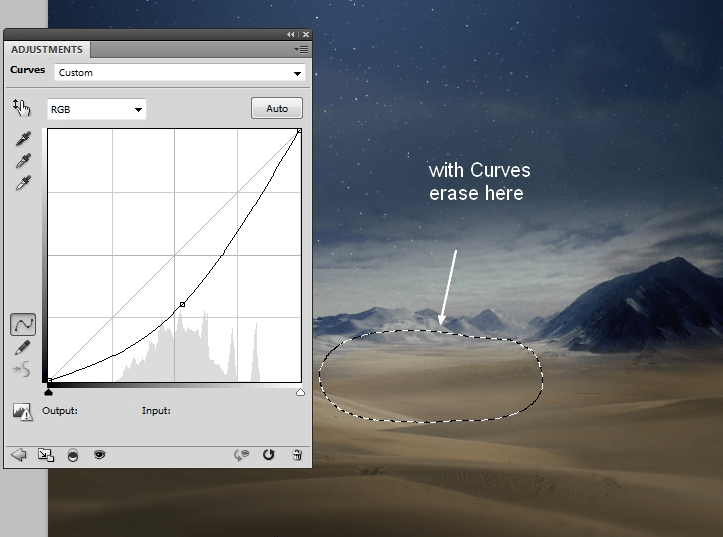
Step 10
I used Color Balance the change the foreground color: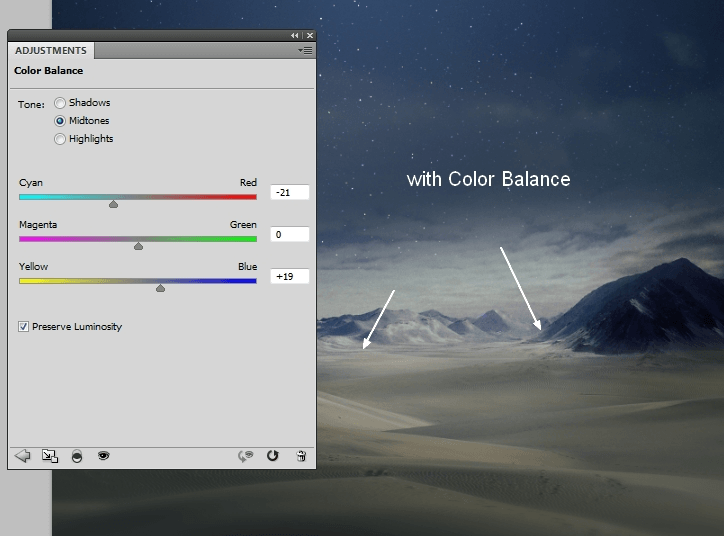
Step 11
To add some misty effect to the scene, I made a new layer, used a soft brush with the color #cadbe7, the opacity and flow about 50% to paint over the image, especially the mountains:
Step 12
Open the planet 1 file. Hide the dark background and press Cmd/Ctrl+Option/Alt+Shift+E to merge all visible layers. Move the merged planet into our main document, place it at the top right of the sky. Position this layer under the foreground and background ones.
Change the mode to Screen 100% and use a layer mask to blend the dark side of the planet with the sky:

Duplicate this layer and resize it to be smaller. Place it beside the first:

Step 13
Place the planet 2 at the left side of the image, behind the mountains, change the mode to Screen 100%. Use a layer mask to blend it with the sky:

Step 14
Open the star background pack. I chose the image “starry 5″ and placed it onto the planets at the top right. Use Cmd/Ctrl+T (Warp mode) to tweak it and set this layer under the planet group:
Change the mode to Screen 100%:

Step 15
I used Hue/Saturation for this layer:
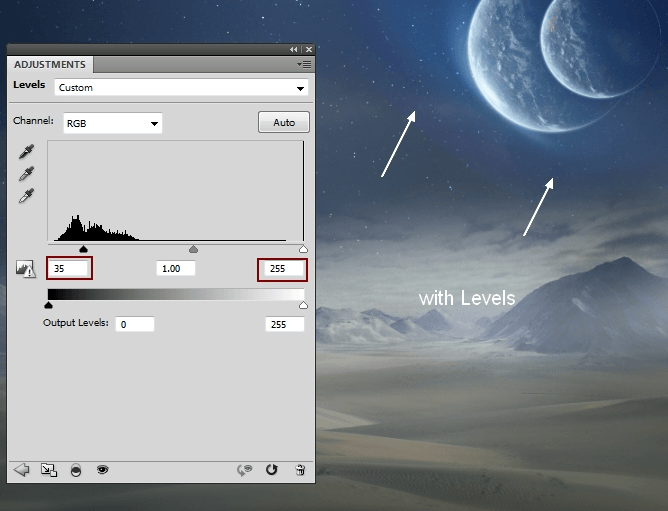
I used Levels to change the contrast of this effect:
Step 16
Place the nebula 2 image at the left side of the sky and change the mode to Screen 100%:
Use a layer mask to erase a part on the image as shown below:

Step 17
I used Hue/Saturation for this effect:
I used Levels to remove its visible edges:

Step 18
Open the nebula 3 image. Press Cmd/Ctrl+J to duplicate this layer. Go to Filter > Liquify and choose the Forward Warp Tool (W):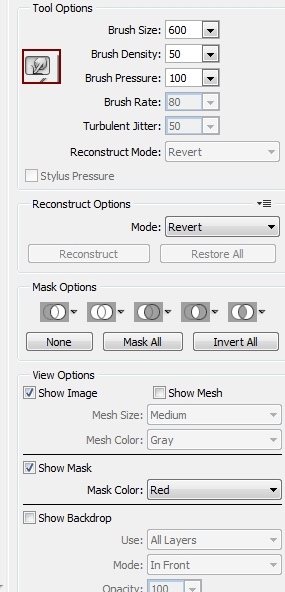
Use this tool to tweak the nebula effect as I did below:

Drag this layer into our working document and place it above the nebula 2 layer (still under the planets, foreground and background ones). Use Cmd/Ctrl+T to transform it as shown below:

Change the mode to Screen 100% and use a layer mask to reduce the effect at the top edges of the scene and on the planets:

Step 19
I used Levels to darken the effect: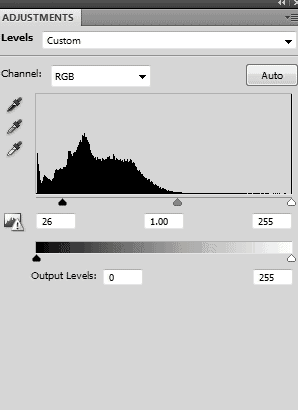
Step 20
Place the nebula 1 image in the center of the sky and change the mode to Screen 100%:
Use a layer mask to remove the light on the middle and at the edge to get a subtle effect:

Duplicate this layer and use the Warp Tool (Edit > Transform >Warp) to bend this nebula image as shown below:

Use a layer mask to remove the hard edges and leave the effect visible only on the planet 2:

Step 21
Make two these layers selected and press Cmd/Ctrl+G to group them. Change this group mode from Pass Through (default group mode) to Screen 100%. Make a Hue/Saturation adjustment layer to change the color of the nebula 1: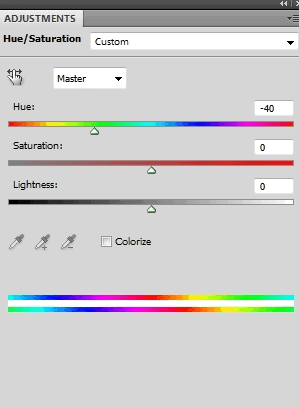
On this layer mask I used a soft black brush to erase the middle as I didn’t want it to be affected by this adjustment layer:

Step 22
I used Color Balance for this effect:

Step 23
I used Curves to make the effect more subtle and on this layer mask used a soft black brush to erase the sides as shown below: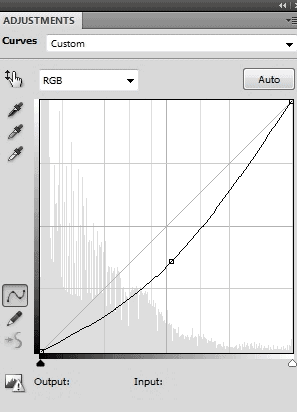

Step 24
Place the model stock photo in the middle section of the ground and remove the background using a layer mask. Set this layer on the top.
To make her shadow, make a new layer under the model one. Hold down Cmd/Ctrl while clicking the model layer mask thumbnail to load its selection:

Fill this selection with black (Shift+F5) and convert it to a Smart Object. Flip it vertically (Edit > Transform > Flip Vertical) and lower the opacity to 50%. Move it under the model feet and transform it using Cmd/Ctrl+T:

Apply Gaussian Blur with 3px and use a layer mask to blur the top of the shadow a little:


Step 25
I used Hue/Saturation to reduce the model saturation:
Step 26
Make a Color Balance adjustment layer for the model: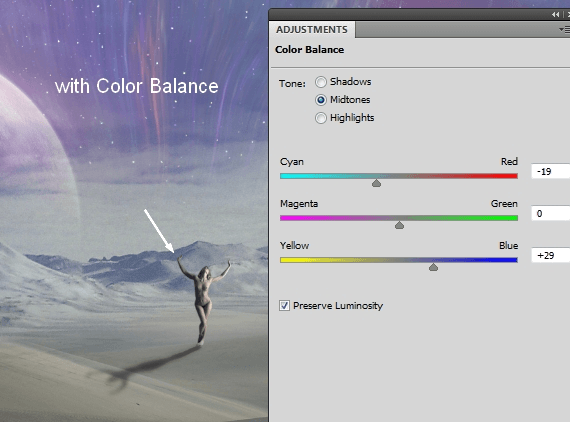
Step 27
I used Curves to brighten the dark side of the model and on this layer mask erase the brighter side a little: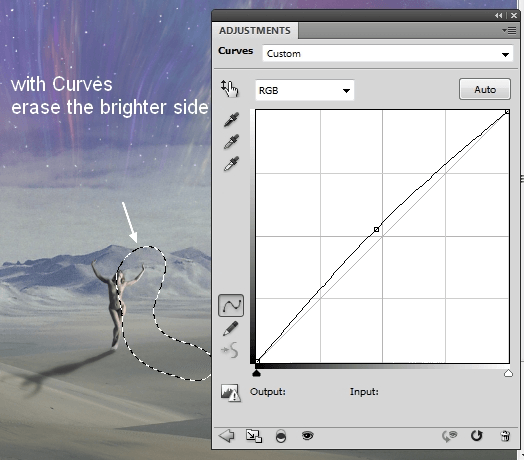
Step 28
Make a new layer on the top and use the Elliptical Marquee Tool (L) to make a selection of a circle above the mode (hold down the Shift key while drawing it):
Go to Edit > Stroke and pick white color:
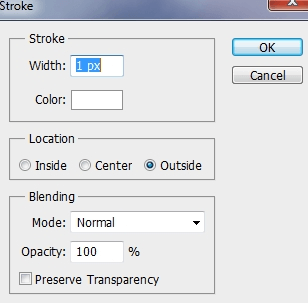

Add a layer mask and use a black brush to break the circle and blur its opacity as shown below:

Duplicate this circle twice, resize them and arrange them inside the first circle. I lowered the middle circle opacity to 50%. Mask them off with the same rule:

Step 29
Active the Line Tool (U) with the settings below:Draw many lines around the planets and above the mountains top, arrange them as you like to get an abstract feel (remember to make them on the separate layers). Here is mine:

Add a mask to several layers and reduce the opacity of the lines, especially at their two sides to avoid a rigid look

Step 30
Draw six lines above the model arms and arrange them to get a look of her holding these lines. I lowered the opacity of some lines to 30, 50 and 70%:
Step 31
Create a new layer on the top. Use the Elliptical Marquee Tool to draw a circle:
Active the Gradient Tool with Radial Gradient, the colors #834115 and #f8b2f2. Drag a line from the bottom left to the top right:

Convert this layer to a Smart Object and scale it down:

Duplicate this layer several times and arrange the spheres on the top of the lines on the mountains, in the sky, beside the planets and above the desert. I applied Gaussian Blur with 8 px to the sphere nearest the foreground and to another 4px to add some depth to the scene:

Step 32
For the one beside the two planets, I used Channel Mixer to change its color:
Step 33
Make a group for all the spheres and change the group mode to Normal 100%. Use Hue/Saturation to desature some of them: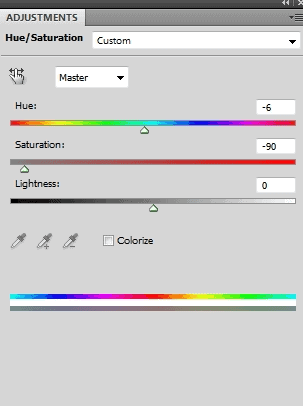
On this layer mask use a soft black brush to reduce this adjustment layer effect, especially the ones above the lines and in the sky:

Step 34
I used Color Balance for these spheres to add some blue to them: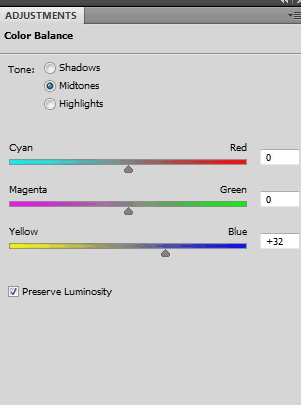
On this layer mask use a soft black brush to clear the effect on the ones on the desert:

Step 35
I used Curves to brighten some spheres: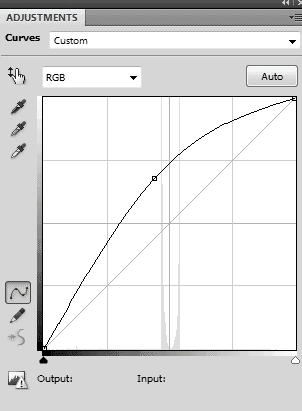
On this layer mask use a soft black brush to erase the ones on the desert and in the sky as they’re in the dark side of the scene:

Step 36
Make a new layer on the top. Use a soft brush with the color #d65f35 and #fbbd59 to spot on the picture as shown below:
Convert this layer to a Smart Object and use Cmd/Ctrl+T to transform it into a line, place it above one of the model arms, between the white lines:

Change this layer mode to Linear Dodge 100% and duplicate it, place it above the another arm:

Step 37
Duplicate this layer twice and use the Warp Tool to bend it. I placed them at the top left and right:
I applied Gaussian Blur with 3 px to them to soften the edges:

Step 38
Make a group for this light effect and change the group mode to Linear Dodge 100%. I used Color Balance for this effect: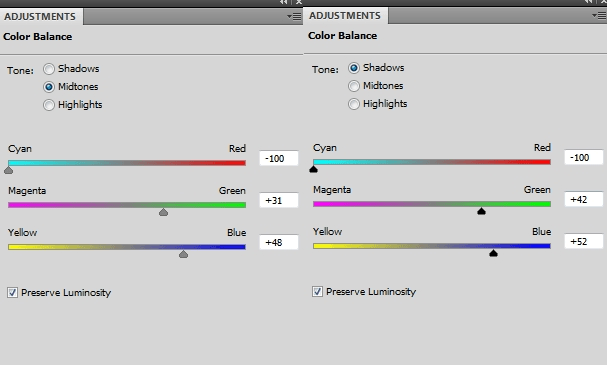
On this layer mask erase the light lines on the model arms:

Step 39
Drag the nebula 4 image onto the white circles, change the mode to Screen 100%. Use the Warp Tool to tweak the effect a little:
Use a layer mask to erase the effect as shown below:

Duplicate this layer and place it onto the model body:

Step 40
Open the wireframe pack. I choose a triangle one and put it inside the white circles:
To invert its color, go to Layer > New Adjustment Layer > Invert:

Step 41
Duplicate the planet 1 and place it inside the wire triangle. Place this layer above the planets group and change the mode to Normal 100%:
I used Curves to reduce the planet contrast:

Step 42
I used Color Balance to change its color:
Step 43
Open the light effect pack. I chose the number 40 and duplicated the background layer. Go to Filter > Liquify and tweak it as done with the nebula 3 in the step 18:
Place it onto the model body and change the mode to Screen 100%. Use the Warp Tool to bend it a little to fit the model body:

Duplicate it five times and arrange them around the model body to make the light effect more visible, use a layer mask if needed to remove the unnecessary parts:

Step 44
Duplicate the first layer twice and make them bigger using Cmd/Ctrl+T. Place them inside the white circles:
Use a layer mask to erase some unwanted details and make the effect more subtle:

Step 45
Make a group for the light layers in the two previous steps and change the group mode to Screen 100%. Use Color Balance to add more warm tone to them: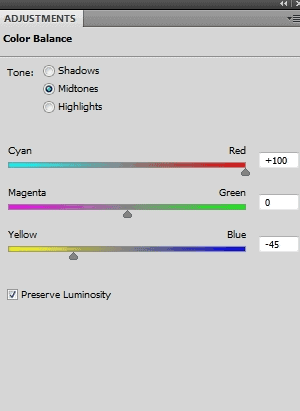
Step 46
It’s time for coloring the scene. Create a Gradient Map adjustment layer on the top: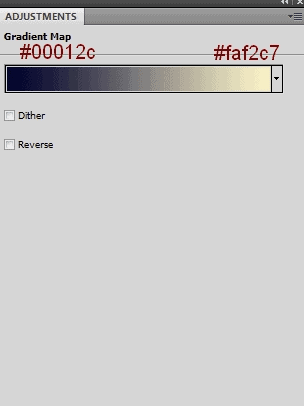
Change this layer mode to Soft Light 100%:

Step 47
I used Color Balance to add some cyan/blue to the image: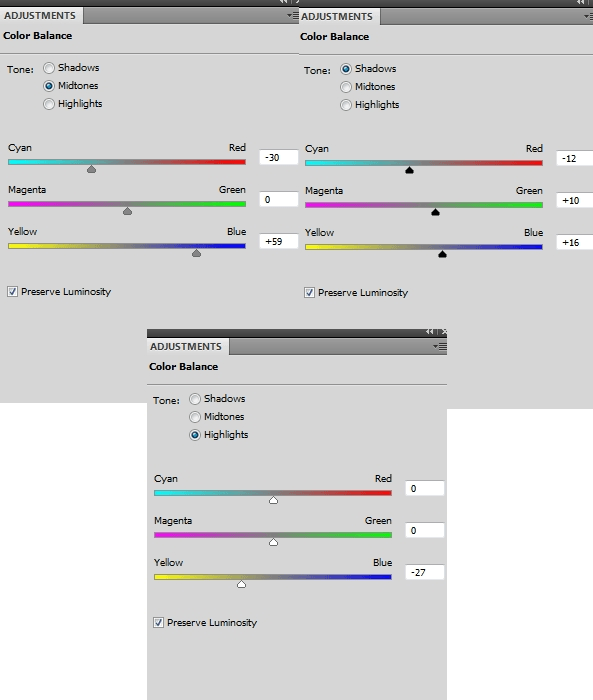

Step 48
I used Selective Color to adjust the cyan settings: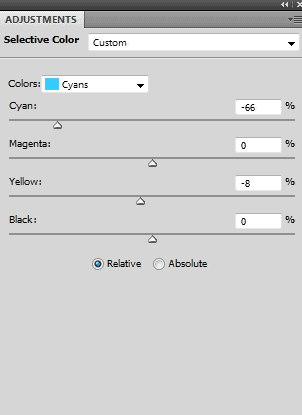

Step 49
I used Curves to increase the contrast of the scene: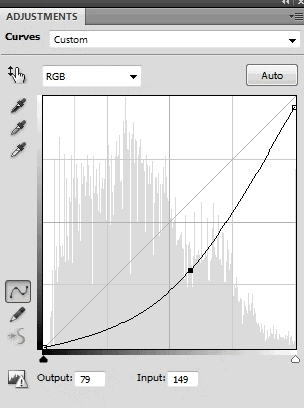
On this layer mask use a soft black brush to erase the area around the model and circles to keep its lightness:

Step 50
I used Vibrance to enhance the final effect: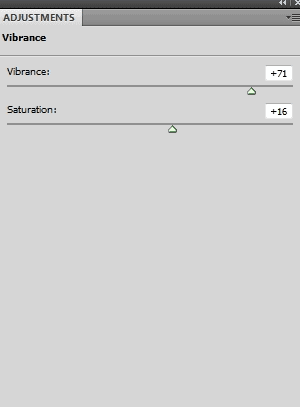
On this layer mask use a soft black brush with the opacity about 40% to reduce the effect on the light around the circles:

Final Results

0 Response to "Create an Abstract Sci-Fi Scene with Photoshop"
Post a Comment